Welding Machine Knowledge
Drawn Arc vs Capacitor Discharge Stud Welding: How to Choose the Right Process
The Cost of Choosing the Wrong Stud Welding Process
Imagine this: You’re mid-production on a critical project—whether it’s fabricating thin-gauge electronic enclosures or assembling structural steel for a bridge—only to discover your welds are failing. Maybe the studs are snapping under load, or you’ve burned through delicate sheet metal. The culprit? Choosing the wrong stud welding process.
Drawn Arc and Capacitor Discharge (CD) stud welding are the two dominant technologies, but they’re designed for vastly different challenges. Pick a CD for heavy-duty structural work, and you’ll get weak, shallow welds. Using curved surface printing processes on thin materials can lead to deformation and burn-through issues. This guide will help you choose the appropriate process based on your project requirements, saving time, reducing rework, and avoiding additional losses.
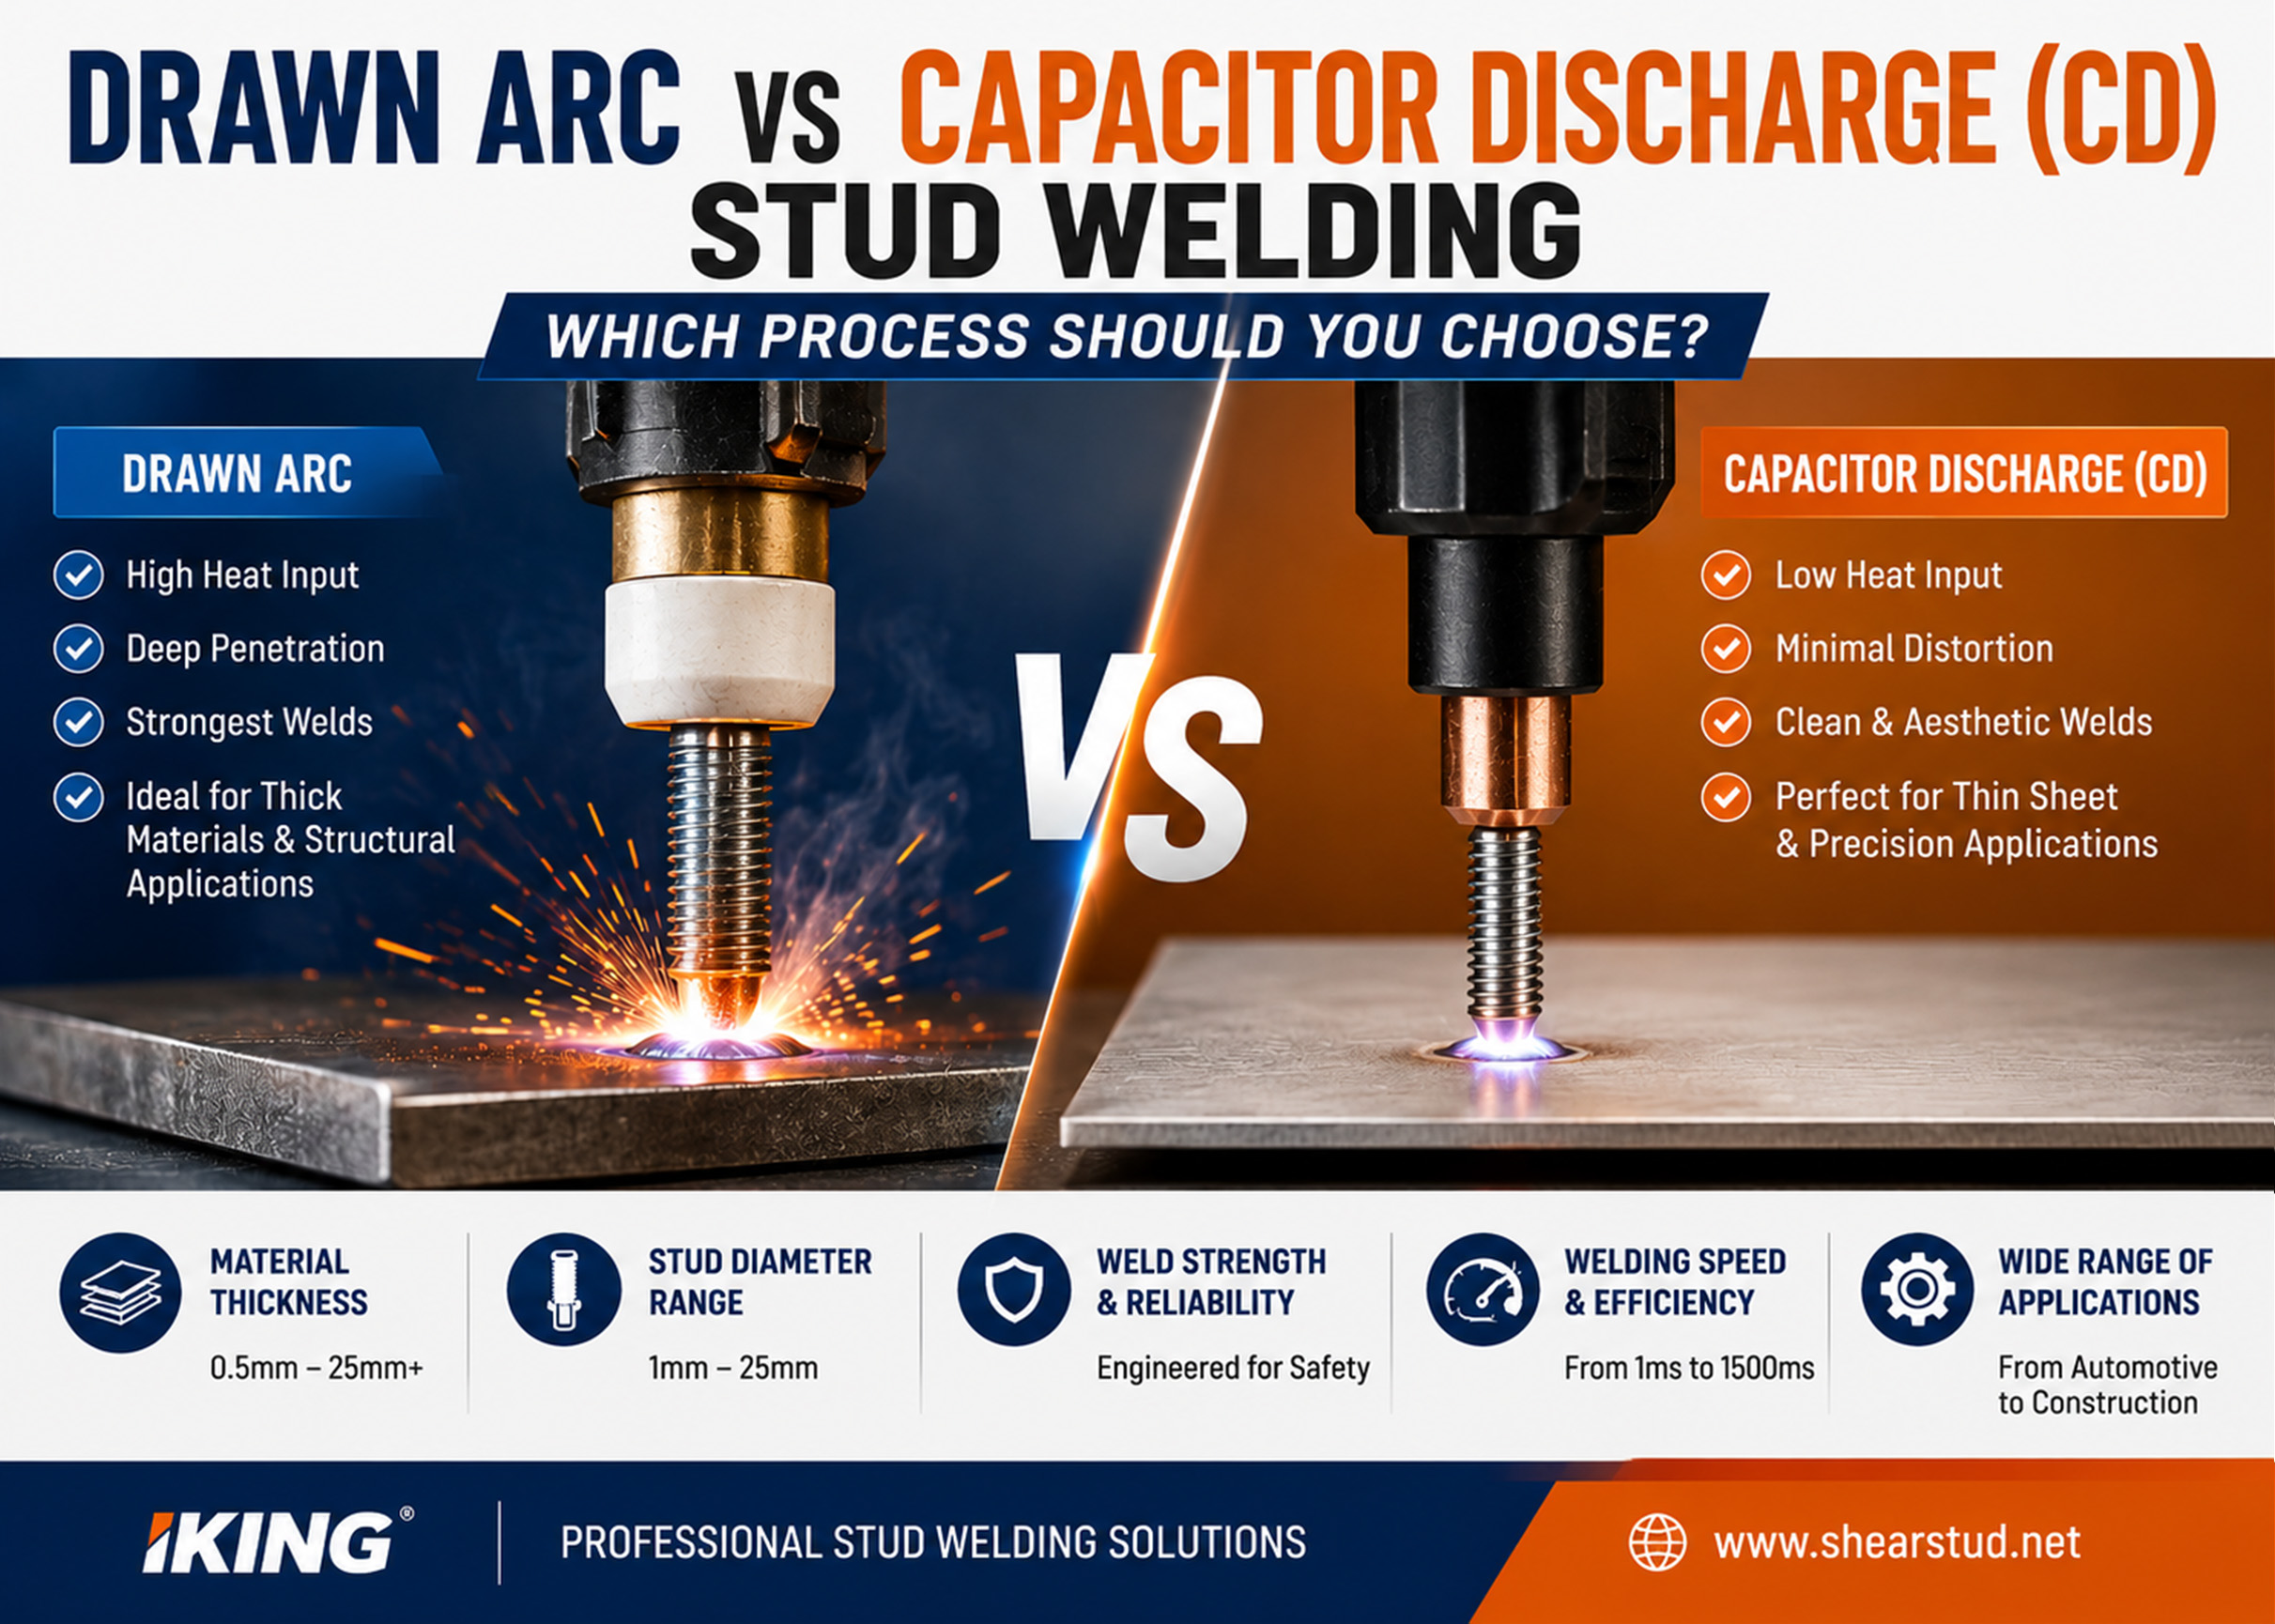
Different Working Principles
1. Capacitor Discharge (CD) Stud Welding:
CD welding is the "precision tool" of the two. It stores energy in a capacitor bank, then discharges it in 1–6 milliseconds—faster than the blink of an eye. Here’s how it works:
- A precision-molded "pip" on the stud tip makes contact with the base material.
- When triggered, the capacitor bank releases energy, vaporizing the pip to initiate a tiny arc.
- This melts a localized spot on both the stud and base material.
- A spring in the weld gun plunges the stud into the molten pool, which solidifies instantly—creating a clean, strong bond.
Key advantages:
- No ceramic ferrules or shielding gas required (reducing consumables and cleanup).
- Minimal heat-affected zone (HAZ)—less than 1/15 the stud diameter.
- Zero reverse-side marking—critical for visible or sealed components.
2. Drawn Arc Stud Welding:
Drawn Arc is the "workhorse" for structural applications. Unlike CD, it uses a continuous DC power supply (400–2,000 amps) to maintain an arc for 100–1,500 milliseconds—long enough to create deep fusion. The process:
- The stud is clamped in a gun with a ceramic ferrule (to contain molten metal).
- When activated, the gun’s lift mechanism raises the stud, drawing a pilot arc.
-
The main arc melts both the stud base and a larger area of the workpiece.
-
The stud plunges into the molten pool, and the ferrule shapes the weld fillet as it cools.
-
Key advantages:
-
Full penetration welds—stronger than the stud itself (exceeds AWS D1.1 standards).
-
Tolerates surface contaminants (rust, mill scale) better than CD.
-
Handles large stud diameters and thick base materials with ease.
Quickly select based on your needs
|
Parameter
|
Drawn Arc Stud Welding
|
CD Stud Welding
|
|---|---|---|
|
Base Material Thickness
|
≥ 1.6 mm structural steel and heavy plate
|
0.5–3 mm sheet metal
|
|
Stud Diameter Range
|
3–25 mm (M3–M25)
|
1–10 mm (M1–M10)
|
|
Welding Time
|
100–1500 ms
|
1–6 ms
|
|
Heat Input
|
High, deep penetration
|
Extremely low, minimal distortion
|
|
Protective Accessories
|
Ceramic ferrule required
|
No ferrule required
|
|
Backside Appearance
|
Visible heat marks and discoloration
|
No visible marking
|
|
Weld Strength
|
Structural-grade strength with superior tensile and shear performance
|
Strong and reliable for thin-sheet applications
|
|
Surface Preparation
|
Tolerates light rust and mill scale
|
Requires clean, flat surfaces free of oil and coatings
|
|
Equipment Size
|
Large transformer/rectifier systems
|
Compact and portable units, compatible with standard power supplies
|
Match the optimal welding process according to the application scenario
Ideal Use Cases for CD Stud Welding
1. Electronics & medical equipment It attaches tiny studs onto circuit boards and medical hardware without overheating fragile sensitive parts.
2. Automotive body panels Fasten support brackets onto thin sheet metal panels, with zero warping or unsightly surface distortion.
3. HVAC systems & household appliances Mount fittings to ventilation ducts and equipment casings. The smooth, tidy welds eliminate extra sanding or touch-up work.
4. Mass automated production Robotic assembly lines hit throughput rates above 1,200 welds per hour to keep production moving quickly.
Ideal Use Cases for Drawn Arc Stud Welding
1. Structural steel & construction projects Creates solid shear connectors for bridges and commercial buildings, engineered to hold up against seismic stress.
2. Shipbuilding & marine manufacturing Fastens hull hardware securely. Joints hold strong against corrosion and avoid leak-prone through-holes entirely.
3. Heavy industrial machinery Mount lifting lugs and fixtures onto thick equipment frames, compatible with oversized studs as big as 25 mm.
4. Energy & heavy industrial equipment Works reliably on boilers and pressure vessels, standing firm even under extreme heat reaching 1000°C.
Three Steps to Selecting the Optimal Welding Method
Step 1: Consider the Substrate
If thickness ≤ 3mm, such as thin metal sheets, brass, or copper, avoid burn-through: CD welding.
If thickness ≥ 1.6mm, such as structural steel or thick plates, deep penetration is required: pull arc welding.
Step 2: Strength Requirements
Requires structural integrity, load-bearing joints, and seismic resistance: pull arc welding, full penetration weld.
Requires precision over strength, aesthetically pleasing parts, and non-load-bearing components: CD welding.
Step 3: Production and Aesthetics
High-volume production, no post-processing required, rapid cycles, clean welds: CD welding.
Allows ring removal and heat marks, prioritizes strength over appearance: pull arc welding.
Common Mistakes to Steer Clear Of
Even seasoned fabricators often run into avoidable issues simply by misapplying these two stud welding processes. Here are the most frequent errors and how you can prevent them on your next job.
Using CD welding for oversized studs
CD welding is built for small, precision fasteners. Any stud larger than 10mm in diameter will not achieve adequate fusion, resulting in weak, unreliable welds that easily fail under load.
Skipping surface prep for CD applications
CD welds rely on ultra-clean contact points. Oil, rust, or residual mill scale on the workpiece will cause incomplete bonding and cold welds. Unlike CD welding, drawn arc welding is far more tolerant of minor surface imperfections.
Neglecting ferrules during drawn arc welding
Ceramic ferrules are essential for consistent arc weld quality. Without them, molten metal splatters uncontrollably, creating uneven weld fillets, surface defects, and inconsistent bond strength.
Mismatching processes to material types
Each method has its sweet spot. CD welding works best on thin brass and copper components, while drawn arc welding delivers stronger, more reliable results on stainless steel and thick aluminum plates.
Conclusion: Choose the appropriate welding process based on the project's "non-negotiable factors."
For specialized projects, such as those involving mixed materials or extreme temperatures, consult a stud welding expert to optimize parameters—but this guide will help you with 90% of the work.If you have any questions about a specific application, leave a comment below, and we'll help you find the perfect solution!